Soundproofing a basement ceiling does not have to cost a fortune, but it rewards honesty. The cheapest methods genuinely reduce certain kinds of noise and are genuinely useless against others. Go in knowing which noise each fix targets, and you can make a real dent for very little money.
This guide ranks basement ceiling soundproofing methods from free up through higher-budget upgrades, scored on value: noise reduction per dollar. We will be blunt about what each method can and cannot do, because the fastest way to waste money on soundproofing is buying the right product for the wrong type of noise.
The Two Kinds of Basement Ceiling Noise
Noise through a ceiling falls into two categories, and they need different solutions.
Airborne noise is sound carried through the air: voices, TV audio, music. It leaks through gaps and thin spots, and is reduced by airtightness and mass.
Impact noise is vibration carried through the structure: footsteps, dropped objects. It travels through the floor joists themselves and is the hardest, most expensive noise to stop.
Cheap methods, sealing, rugs, cavity insulation, mainly help with airborne noise. Almost nothing cheap stops impact footsteps, because impact energy rides through the wood framing itself. Decoupling the ceiling from the joists or adding heavy mass helps, but those are the mid and higher-budget methods.
Tier 1: Free and Near-Free (Under $30 Total)
1. Seal every gap, crack, and penetration with acoustic sealant
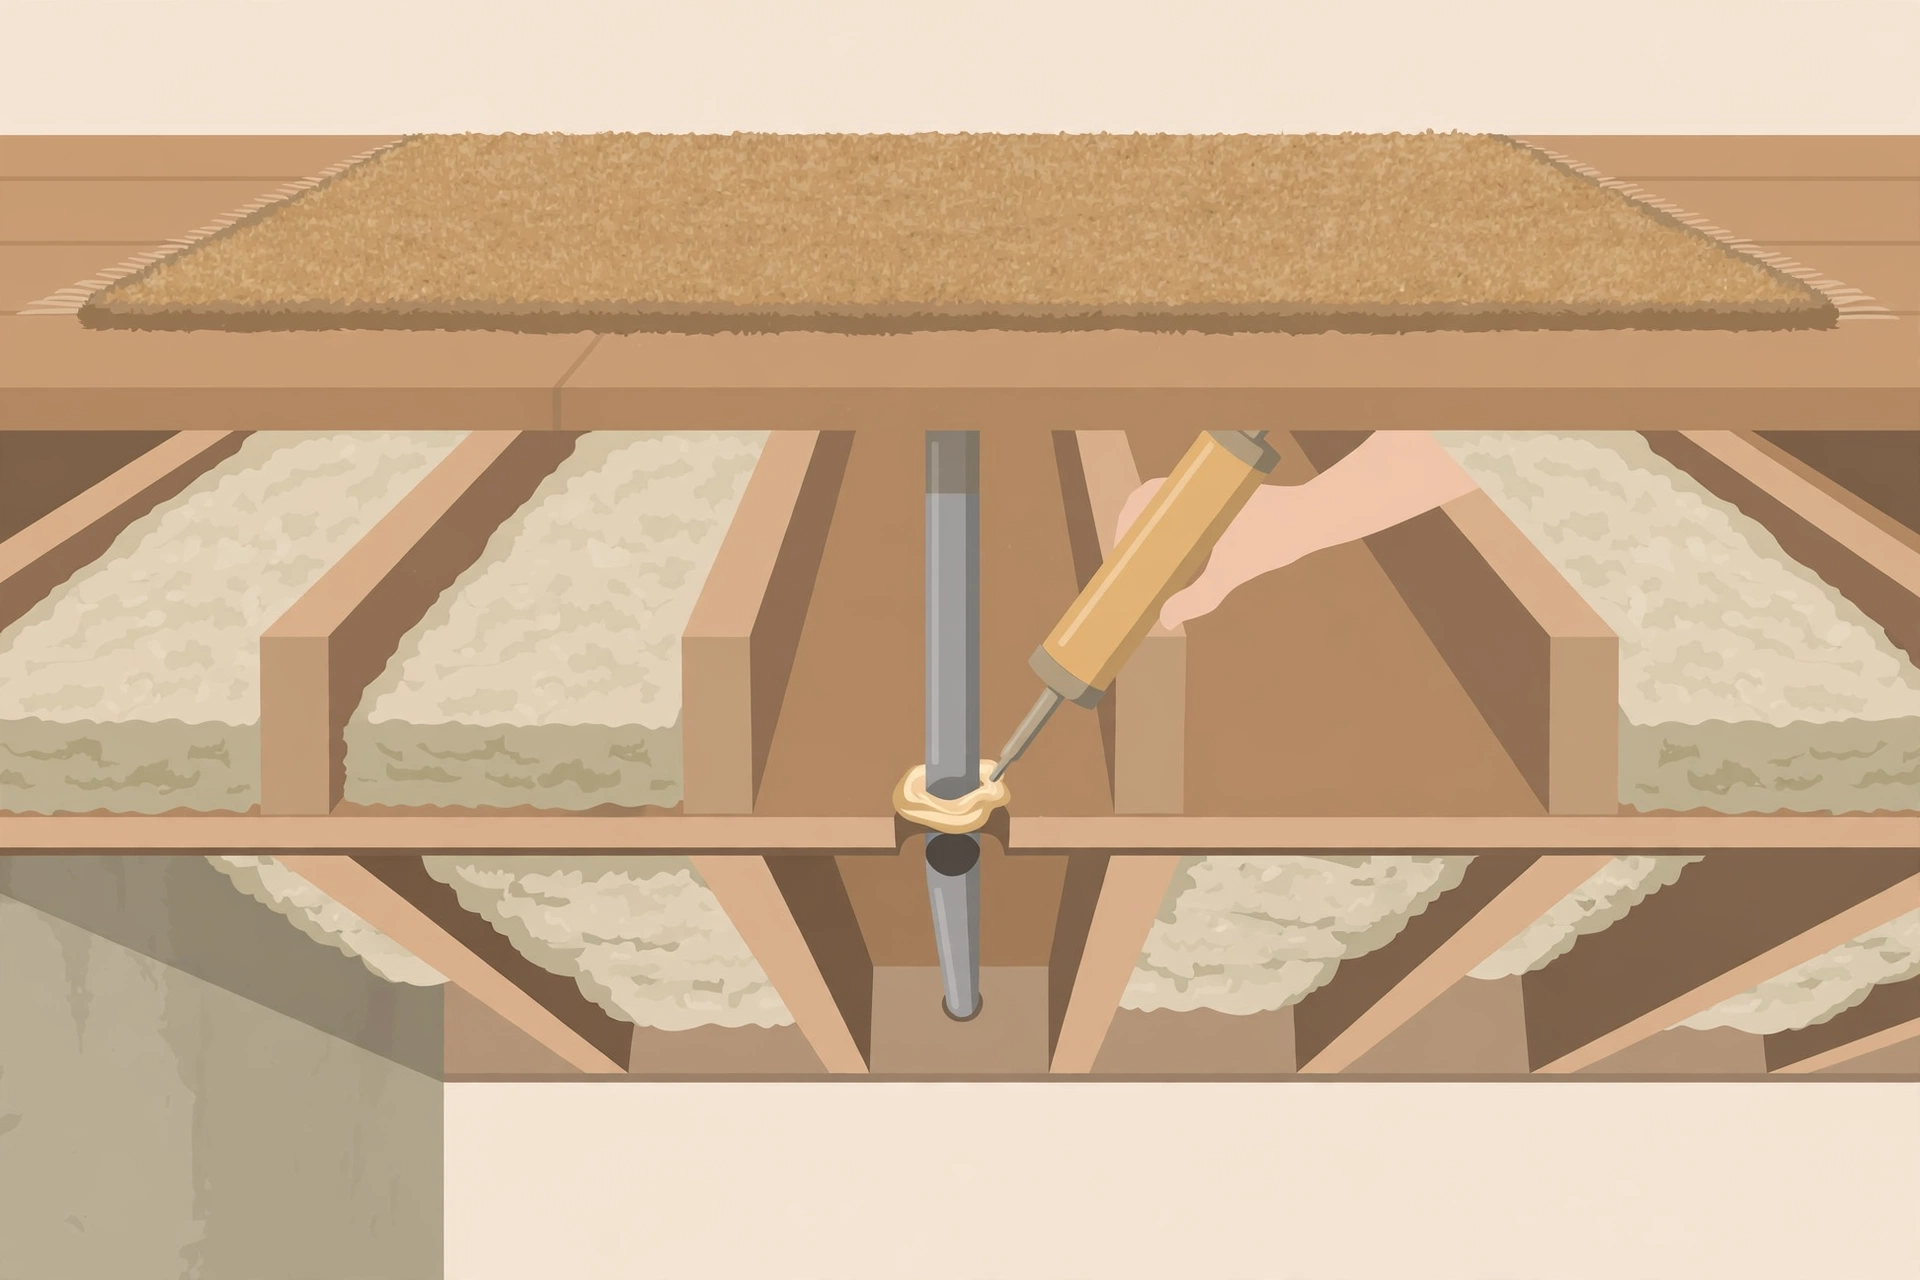
The single highest-value thing you can do to a basement ceiling. Sound is like water: it finds the path of least resistance. Gaps around pipes, plumbing stacks, HVAC ducts, electrical boxes, and recessed can lights let a surprising amount of sound through, because even a small opening defeats the sound-blocking ability of an otherwise solid ceiling.
Acoustic sealant differs from regular caulk in that it stays flexible permanently instead of drying hard and cracking, which matters because buildings move and vibrate. A 28-ounce tube runs roughly $8 to $12.
Target every penetration you can reach: where pipes pass through the subfloor, around duct boots and registers, where wiring enters boxes, and along the perimeter where the ceiling meets the tops of the walls. Sealing first makes every later step more effective, because mass and insulation cannot do their jobs when sound bypasses them through holes.
2. Tighten loose fixtures and rattles
A loose vent cover, an unsecured duct strap, or a rattling junction box cover amplifies noise dramatically. Walk the basement with loud audio playing upstairs and listen for anything that buzzes or vibrates sympathetically. Tighten screws, add foam tape behind vent grilles, secure loose ductwork, and make sure can-light trim rings sit flush. It costs nothing but an hour, and a rattle-free ceiling sounds noticeably quieter.
3. Rearrange the room above
Where upstairs activity happens matters. If the family room sits over the basement bedroom and a quiet dining room sits over basement storage, swapping the rooms’ functions moves noise away from the quiet zone. Heavy upholstered furniture, bookcases, and rugs placed over the loudest zones absorb sound before it reaches the floor. This softens TV noise and voices, but does almost nothing for hard-soled footsteps on bare hardwood, since impact energy goes straight into the joists regardless of where the couch sits.
Tier 2: Cheap Upgrades ($30 to $200)
4. Rugs with thick pads upstairs
If the floor above is hardwood, laminate, or tile, a large area rug over a thick pad is one of the best cheap soundproofing buys. The rug absorbs airborne sound; the pad cushions footfalls slightly. Look for dense pads at least 3/8 inch thick, since memory foam or dense felt outperform thin waffle pads.
A thick rug pad runs roughly $0.60 to $1.50 per square foot, so a 9×12 area costs about $65 to $160 for the pad, plus the rug. Many people already own rugs and only need the better pad.
The honest limit: rugs meaningfully reduce airborne noise and soften the sharpness of footsteps, but they do not stop impact noise structurally. Heavy footfalls still come through because impact energy enters the floor structure beneath the pad.
5. Draft-stop around pipes, vents, can lights, and the basement door
Systematically stopping air movement around ceiling penetrations is the bigger sibling of Tier 1 sealing. Recessed can lights are notorious leaks, essentially holes in the ceiling with a thin metal can in them. Around plumbing stacks and large duct penetrations, backer rod plus acoustic sealant fills gaps too large for caulk alone.
Do not forget the basement door, often the single worst sound leak in the whole assembly. A hollow-core door with a half-inch gap at the bottom can admit more sound than the entire ceiling. Weatherstripping plus a door sweep runs $15 to $40 in materials and closes a leak that ceiling work alone can never fix.
6. Seal the rim joist and sill plate area
The rim joist, the board capping the ends of the floor joists around the basement perimeter, is a common flanking path. Noise enters the rim joist cavity from upstairs walls and radiates into the basement around the ceiling edges. Caulking the seams and adding rigid foam or mineral wool in the cavities cuts this flanking path with cheap materials, and it punches above its price because it attacks sound traveling around the ceiling instead of through it.
Tier 3: Mid-Budget ($200 to $1,000+ Depending on Basement Size)
This is where you start buying real soundproofing performance. These methods are still DIY-friendly, but costs scale with square footage.
7. Mineral wool insulation between joists
Filling joist cavities with dense mineral wool sound-attenuation batts is the classic mid-budget upgrade. The insulation absorbs sound energy bouncing inside the cavities, killing the drum-like resonance of empty joist bays. Friction-fit batts install without fasteners.
Expect roughly $0.70 to $1.50 per square foot in 2026 pricing, so a 500-square-foot ceiling runs about $350 to $750 in materials.
The honest limit: insulation alone, without sealing and without decoupling or added mass, delivers modest results. Insulation improves an assembly that is already airtight and massive; on its own in an open joist ceiling, it removes the hollow echo but blocks little transmitted sound. Seal first, then add mass, then fill cavities.
8. Mass loaded vinyl (MLV)
Mass loaded vinyl is a thin, heavy, flexible sheet, typically one pound per square foot, that adds mass without much thickness. Heavier barriers transmit less airborne sound, so MLV fastened to the underside of joists, with seams sealed, meaningfully reduces voices, TV, and music.
Cost is the catch: roughly $1.50 to $3.00 per square foot, so a 500-square-foot ceiling costs $750 to $1,500 in material. It is heavy and awkward to install overhead, must form a continuous sealed layer to work, and does little for impact footsteps since it does not decouple the ceiling from the joists.
9. Sealant around the full perimeter, again
Once insulation or MLV is in, run acoustic sealant around the entire ceiling perimeter and every remaining penetration. This $20 to $40 materials job protects a $500 insulation investment. Sound flanking around the edges of a treatment is the most common reason mid-budget jobs underperform, and perimeter sealing is the cheapest insurance against it.
Tier 4: Higher-Budget (For Context)
These cost more but are the point where impact noise, the stubborn footstep problem, actually starts to yield. They are included so you can see the full ladder and plan toward them.
10. Resilient channel with a new drywall layer
Resilient channel is a metal strip mounted to the joists that holds drywall on flexible legs, partially decoupling the ceiling surface from the framing. Decoupling is the key weapon against impact noise: if the ceiling drywall is not rigidly attached to the joists, footstep vibration struggles to cross into the room below. The channel itself runs roughly $0.50 to $1.00 per square foot, plus drywall, screws, and sealant.
Installation sensitivity is the caveat. Resilient channel only works if installed correctly: proper orientation, screws hitting only the channel and never the joists behind it, no rigid contact bridging the gap. A single screw driven through the channel into a joist defeats the decoupling at that point.
11. Double drywall with damping compound
The heavyweight approach: two layers of 5/8-inch drywall with viscoelastic damping compound sandwiched between them, ideally hung on resilient channel or sound-isolation clips. The double mass blocks airborne noise, the damping compound converts vibration to small amounts of heat, and the decoupling fights impact noise. This is the assembly behind most serious home theater ceilings.
DIY cost lands roughly $2.00 to $4.00 per square foot in materials depending on the damping compound and whether isolation clips join the assembly. Most effective on this list and most expensive, which is exactly why the value ranking puts the cheap methods first: do Tiers 1 and 2 regardless, since sealing multiplies the effectiveness of everything above it.
The Full Ranking: Best Value First
Ranked by noise reduction per dollar for a typical unfinished or partially finished basement ceiling:
- Seal gaps and penetrations with acoustic sealant. Under $30 in materials, attacks the weakest link, and makes every later step work better. Nothing else comes close on value.
- Tighten fixtures and kill rattles. Free, and rattles are disproportionately annoying relative to the noise that causes them.
- Weatherstrip the basement door and seal the threshold. $15 to $40, closes what is often the single biggest leak in the assembly.
- Thick rug pads under upstairs rugs. $0.60 to $1.50 per square foot, the best cheap treatment for the floor above, with honest limits on footsteps.
- Rearrange the upstairs room. Free, and moving the noise source away from the quiet zone is underrated.
- Seal and insulate the rim joist. Cheap materials, kills a major flanking path most people never think about.
- Mineral wool between joists. $0.70 to $1.50 per square foot, excellent once the ceiling is sealed, modest on its own.
- Mass loaded vinyl. $1.50 to $3.00 per square foot, the most mass per inch of thickness, best for airborne noise where space is tight.
- Resilient channel plus drywall. Higher budget, the first method here that genuinely tackles impact footsteps.
- Double drywall with damping compound. The performance king at $2.00 to $4.00 per square foot DIY, for when nothing else is enough.
What to Do First on a Tight Budget
If you have $100 and a weekend, here is the order that buys the most quiet per dollar:
Step 1: Seal. Buy a few tubes of acoustic sealant and go after every penetration, crack, and perimeter joint you can reach. This is the foundation everything else builds on.
Step 2: Fix the door. Weatherstrip the basement door frame and add a sweep. If sound pours under the door, no ceiling treatment will save you.
Step 3: Soften the floor above. Thick pads under the upstairs rugs, and move heavy furniture over the noisiest spots.
Step 4: Insulate the joist bays. Only after sealing. Mineral wool batts friction-fit between the joists, bay by bay.
Step 5: Add mass if airborne noise persists. MLV or an additional drywall layer, with every seam and the full perimeter sealed.
The pattern: seal first, then insulate, then add mass. Each layer assumes the previous one is done. Skipping straight to insulation or MLV over a leaky ceiling is the classic budget soundproofing mistake, and it is why so many “it barely helped” stories exist. The insulation was fine; the air leaks were doing the talking.
A Note on Fire and Building Codes
Before planning any finished ceiling assembly, check your local building and fire codes. Finished basement ceilings often have fire-rating requirements, for example, many jurisdictions require a fire barrier such as 1/2-inch drywall over foam plastics, and exposed materials like vinyl sheets generally should not be left uncovered in living spaces. Requirements vary by municipality, and what is fine in one town needs a permit and inspection in the next. A quick call to your local building department before buying materials is cheap insurance against tearing work out later.
Frequently Asked Questions
What is the cheapest effective way to soundproof a basement ceiling?
Sealing air gaps with acoustic sealant is the cheapest effective method, typically under $30 in materials. Sound leaks through penetrations around pipes, ducts, wiring, and the ceiling perimeter, and closing those leaks improves every other treatment you add later. Pair it with weatherstripping the basement door for the best results under $100.
Do rugs upstairs actually help with basement ceiling noise?
Rugs with thick pads noticeably reduce airborne noise like voices, TV, and music, and they take the sharp edge off footsteps. They do not stop impact noise structurally, though, because footstep energy travels through the floor joists beneath the rug.
Will insulation between the joists soundproof my basement ceiling?
Insulation alone gives modest results. Mineral wool batts absorb sound bouncing inside the joist cavities and remove the hollow drum effect, but without air sealing they block little transmitted sound. The established order is seal first, then add mass, then fill cavities.
What is the cheapest way to reduce footsteps from upstairs?
Honestly, there is no cheap fix for impact footsteps. Rugs and pads soften them slightly, but real footstep reduction requires decoupling the ceiling from the joists or adding significant mass, both mid to higher-budget projects.
Is mass loaded vinyl worth it for a basement ceiling?
MLV is worth it when airborne noise is the main problem and you need maximum mass in minimum thickness, for example under an existing finished ceiling. At $1.50 to $3.00 per square foot it is one of the pricier mid-budget options, and it must be continuous and sealed to work.
Can I leave soundproofing materials exposed on a basement ceiling?
Generally, no, not in finished living spaces. Many soundproofing materials, including vinyl sheets and foam products, should be covered by a finished surface like drywall, and local fire codes often require it.
Should I soundproof the basement ceiling or the upstairs floor?
Treat the ceiling from below if you can only do one side, since that is where you have access. But the best cheap gains often come from the floor above: thick rug pads, sealed gaps around registers, and furniture placement.
How much does it cost to soundproof a basement ceiling in 2026?
DIY material costs in 2026 run roughly: acoustic sealant under $0.20 per square foot of ceiling, mineral wool batts $0.70 to $1.50 per square foot, mass loaded vinyl $1.50 to $3.00 per square foot, and a full double-drywall assembly with damping compound $2.00 to $4.00 per square foot. A 500-square-foot basement can go from under $100 for a thorough sealing job to $1,500-plus for a full mass and decoupling assembly.